Proctoring Queue
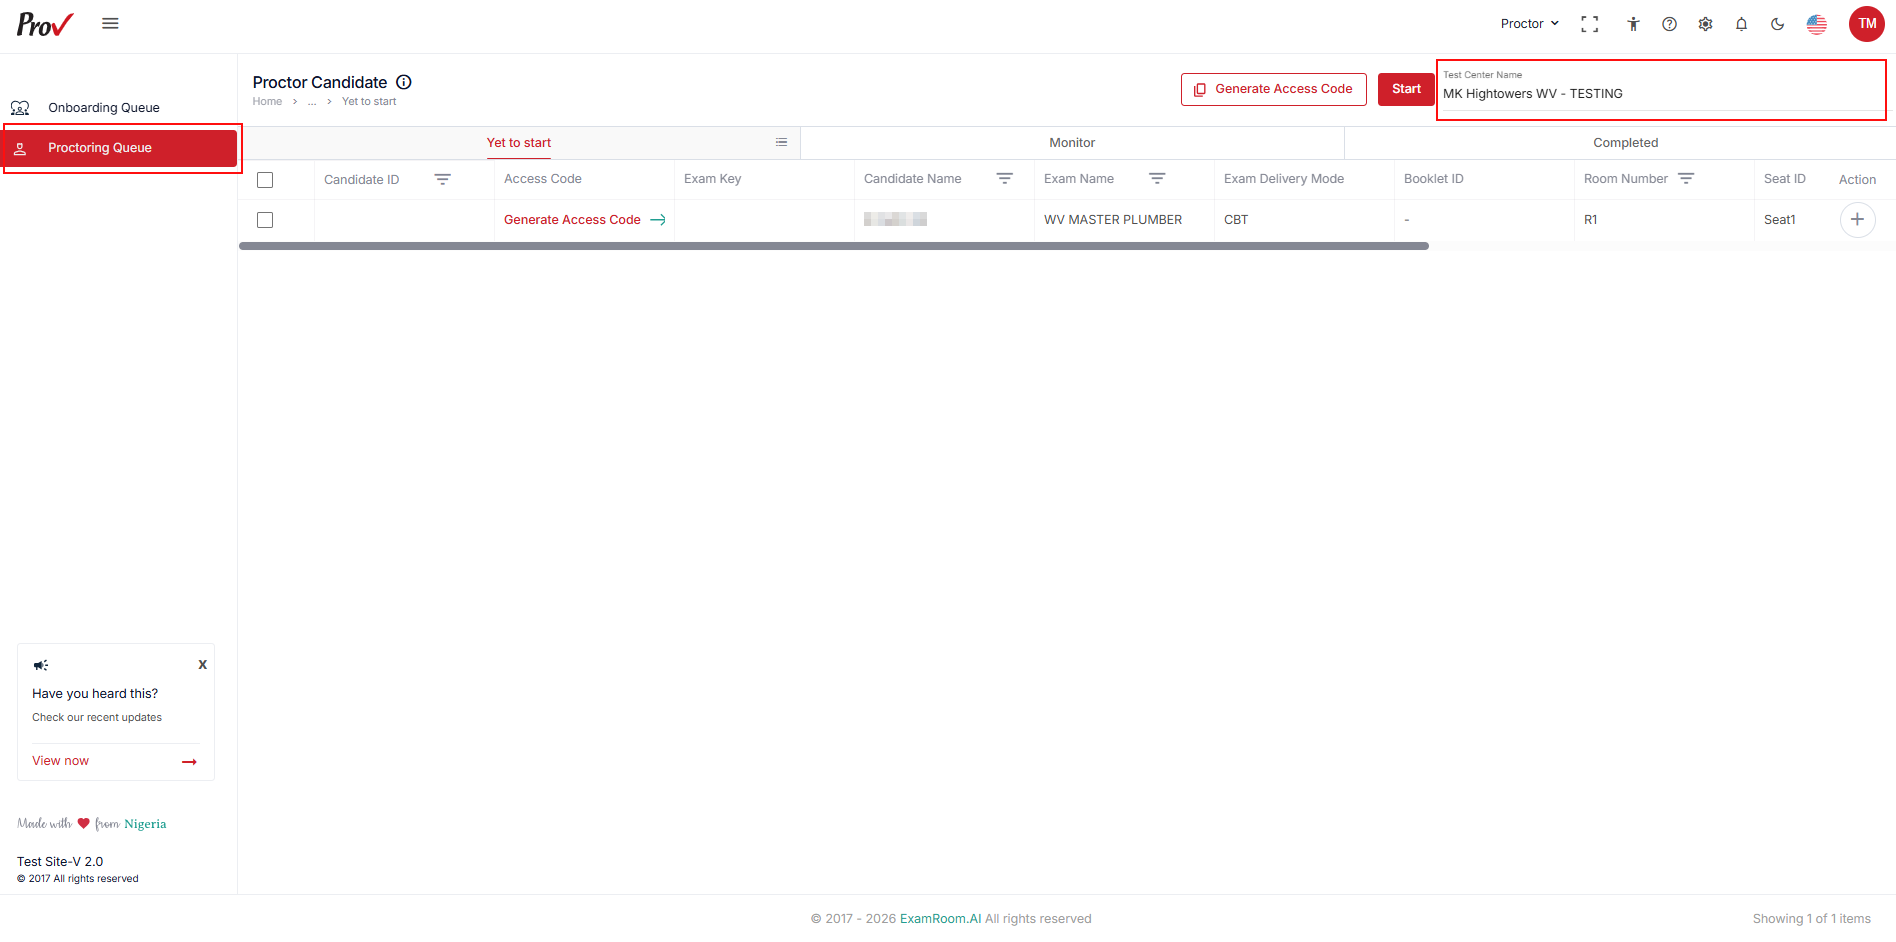
The Proctoring Queue section allows you to view candidates who are ready to begin their exams, generate candidate access information, generate a test package, and access the candidate's test graphics.
Note: The candidate only appears in the proctoring queue after completing the onboarding process.
After logging into the Prov TSM console,
- Click Proctoring Queue from the navigation menu.
- If you are managing multiple test centers, click on the Test Center Name field in the top right to choose the required test center from the list.
- The Proctoring Queue displays candidates according to their current exam status. The queue includes the following tabs:
- Yet to start: The list of candidates who have completed the onboarding and are yet to start the exam.
- Monitor: The list of candidates who are taking the exam.
- Completed: Candidates who have completed their exam are listed.
- The Proctoring Queue displays candidates according to their current exam status. The queue includes the following tabs:
- Select the Yet to start tab to view candidates (onboarding completed) ready to start the exam.
- Review the candidate information displayed in the queue. The candidate list can include the following information:
- Candidate ID
- Access Code
- Exam Key
- Candidate Name
- Exam Name
- Exam Delivery Mode
- Booklet ID
- Room Number
- Seat ID
- Email ID
- Contact Number
- Status
- Action
Note: The information displayed in the queue may vary depending on the candidate and exam configuration.


Generate an Access Code
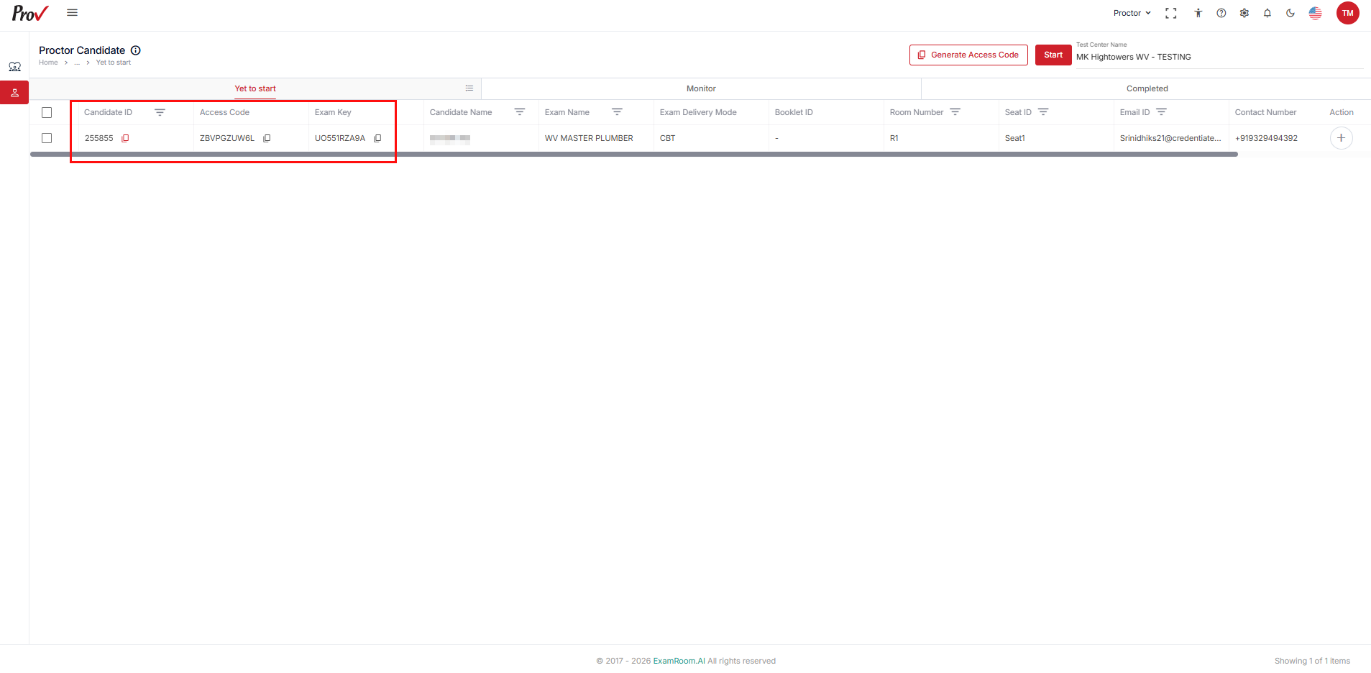
The Candidate ID, Access Code, and Exam Key are used to provide the candidate with the information required to access the exam.
- In the Yet to start tab, locate the required candidate.
- Click Generate Access Code in the Access Code column.
- The system generates an access code for the candidate.
- The system generates an access code for the candidate.
- If you want to generate access codes for multiple candidates at once.
- Select candidates by clicking the checkboxes next to their names.
- Then, click on the Generate Access Code button provided at the top of the page to generate access codes for all the candidates.
- Review the generated Access Code and Exam Key along with the Candidate ID in the candidate row to provide it to the candidate to access the exam.
- Click the Copy icon next to each generated value to copy the access details, or give the candidate the Access Code, Exam Key, and Candidate ID verbally to allow them to access the exam.
- Actions:
- Click the Action icon and select the View Graphics icon to view the allowed reference materials links (allowed books).
- Use the Generate Test Package icon to generate a new test package for the candidate; this will result in losing the current package, and the candidate will need to start the exam from the beginning.
- Once the candidate begins the exam, the candidate details will move from the Yet to Start list to the Monitor list.



Monitor Candidates
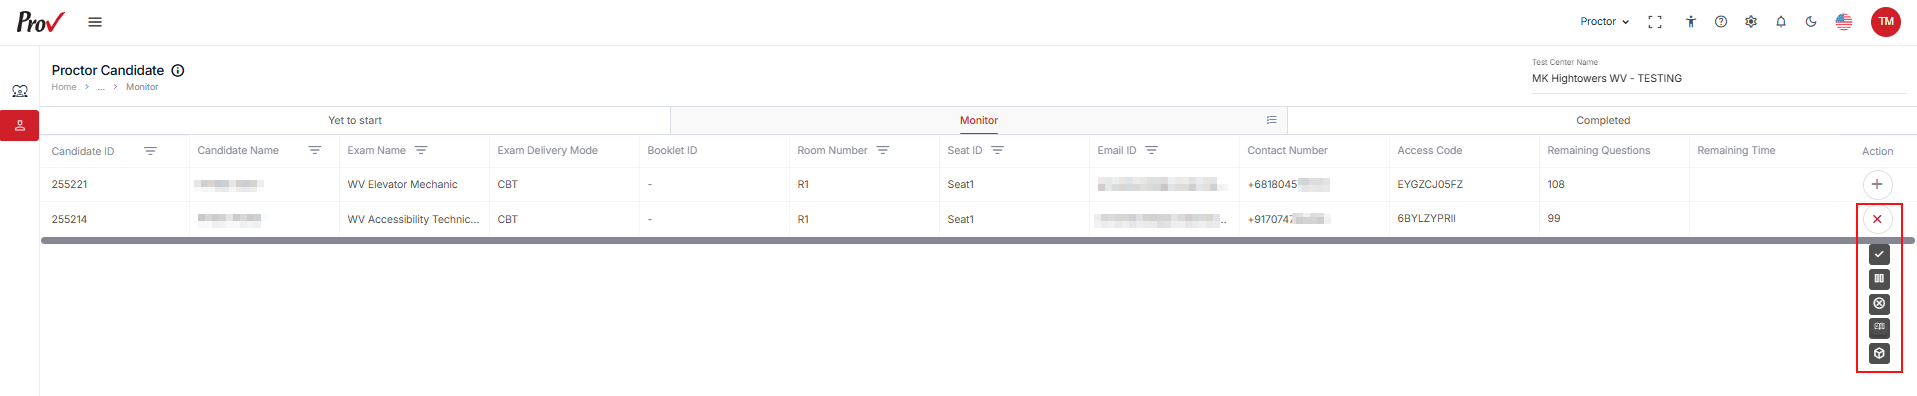
The Monitor tab allows you to view and manage candidates who are currently taking the exam. Using the available action options, you can complete, pause, cancel, or manage the candidate’s exam and reference materials.
- In the Monitor tab, all the candidates who are taking the exam are listed.
- Click the Action icon, then select the following option:
- Complete: Use the Complete icon to mark the candidate's exam as completed.
- Pause Exam: Use the Pause Exam icon to pause the exam.
- Cancel: Use the Cancel icon to cancel the exam.
- View Graphics: Use the View Graphics icon to view the allowed reference materials links (allowed books).
- Generate Test Package: Use the Generate Test Package icon to generate a new test package for the candidate; this will result in losing the current package, and the candidate will need to start the exam from the beginning.
- Once the candidate completes the exam, the candidate details will move from the Monitor list to the Completed list.
Note: After the candidate submits the exam, wait a few seconds for the list to update.
Note: Generating a new package removes the candidate's current progress. The candidate must start the test again from the beginning.
View Results
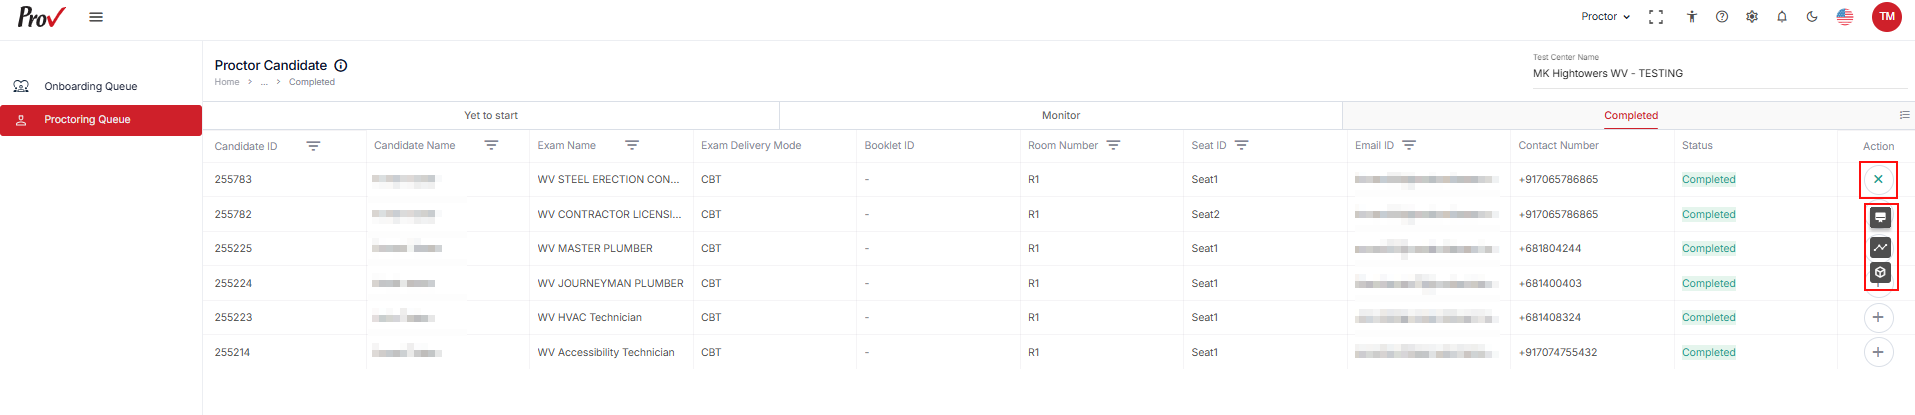
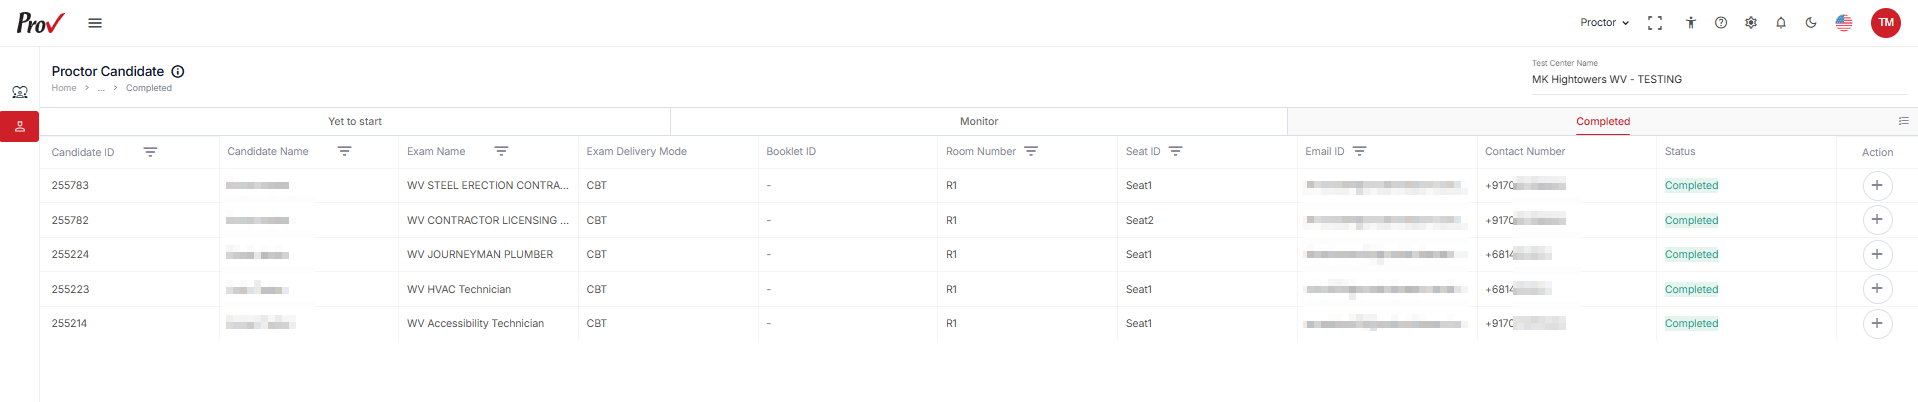
After the candidate completes the exam, the candidate details will move from the Monitor list to the Completed list. In the Completed tab, you can view the candidate’s exam result, view activity logs, and generate a test package for the exam.
- In the Completed tab, all the candidates who have completed the exam are listed.
- Click the Action icon, then select the following option:
- Result: Use the Result icon to view the exam result of the selected candidate.
- Activity Log: Use the Activity Log icon to view the candidate's activity logs.
- Generate Test Package: Use the Generate Test Package icon to generate a new test package for the candidate; this will result in losing the current package, and the candidate will need to start the exam from the beginning.